Import Heightmap
Import Heightmap makes your map's heights from a picture, or from a real place on Earth. Bright pixels become high ground, dark pixels low ground. It can fill the whole map or one area of it, and it shows the result on the terrain before it changes the map.
Files it reads
RustEdit finds the format from the file itself, not from its name. A RAW file has no header: RustEdit finds its layout from its size.
| Format | What it reads |
|---|---|
| PNG | 1 to 16 bits per channel, grey, colour or palette. A 16 bit PNG keeps all its 16 bits. |
| JPG | 8 bits. JPG loses detail; use it only when there is nothing else. |
| EXR | 16 and 32 bit float. The numbers are kept as they are. |
| TIFF | 8, 16 and 32 bit, whole numbers or float, with no compression, LZW, Deflate or PackBits. Most DEM files are TIFF. |
| TGA, BMP | 8 bits per channel. |
| PGM | 8 and 16 bit. |
RAW (.raw, .r16, .r32, .r8) | 8 bit, 16 bit or 32 bit float, either byte order. |
Use a 16 bit or float file when you can. An 8 bit picture has only 256 heights, so the terrain gets steps. Smooth hides them.
How to import a heightmap
- Make or open the map the heights go into. Its size sets how many meters the picture covers.
- Click . The Import Heightmap panel opens.
- Click Heightmap and pick the file. The picture shows on the left, as RustEdit reads it. Areas that end up below the sea are tinted blue. Your map shows on the right, under This Map.
- Set the heights in Heights: Height Offset is the height of black, Intensity is how many meters higher white is.
- With Preview on, look at the terrain in the scene view and at the map on the right.
- Click Import. The line under the button says "Imported" and the file's name.
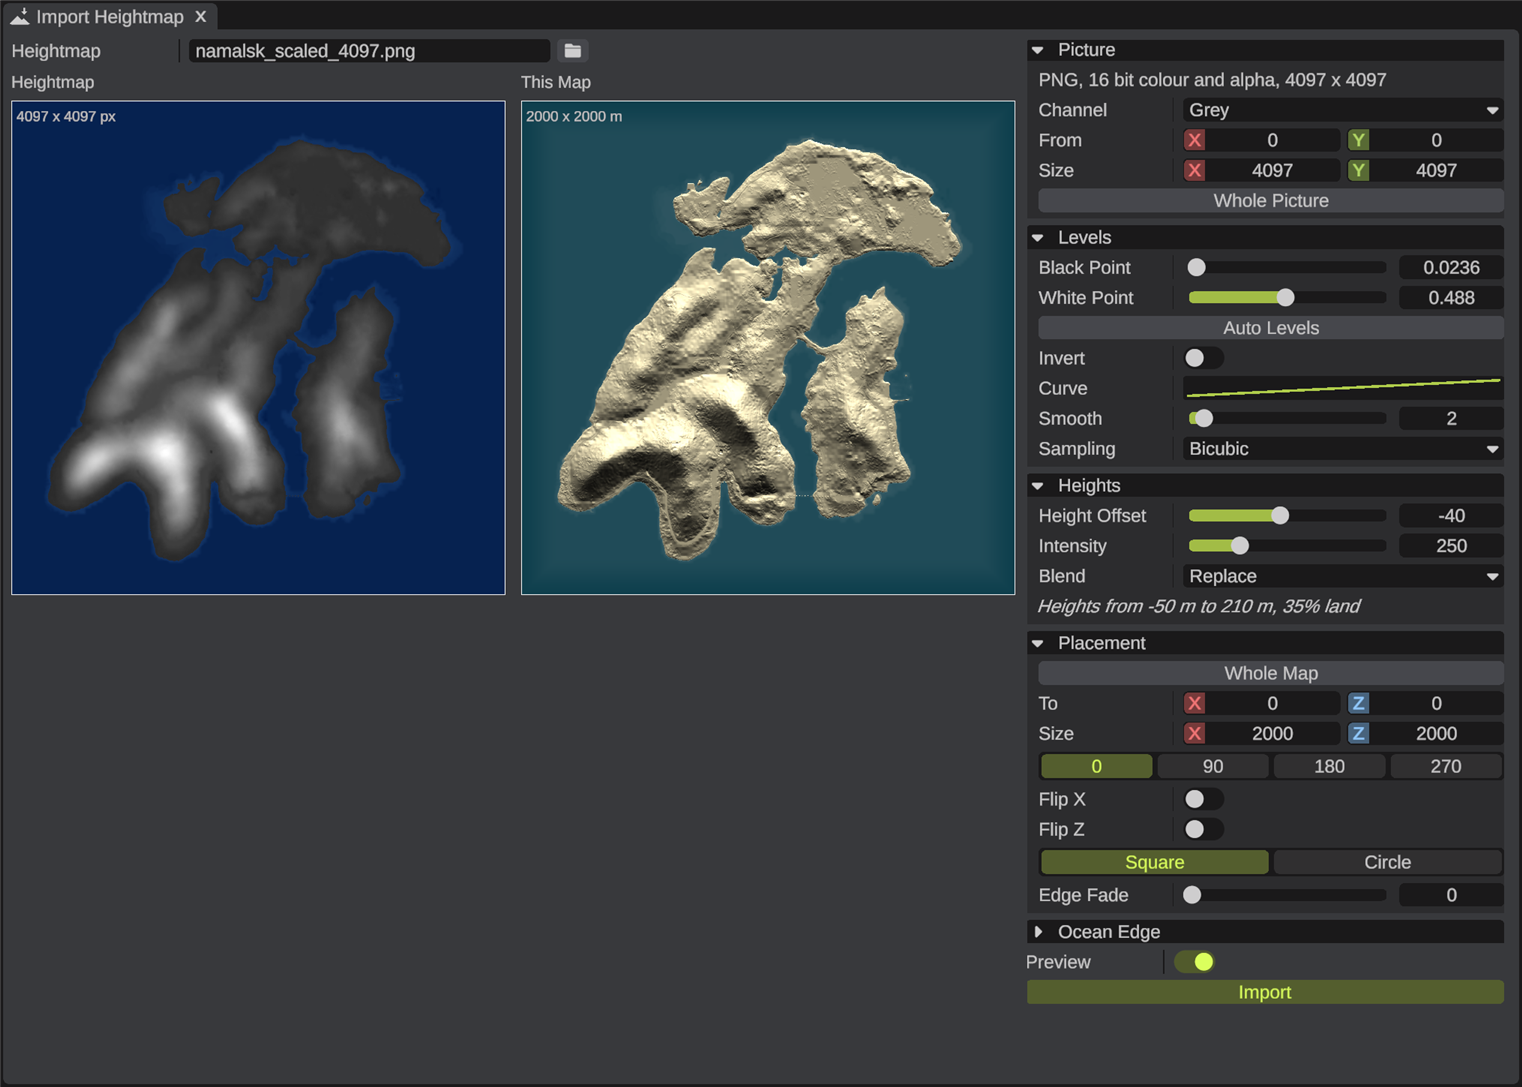
Picture options
| Option | What it does |
|---|---|
| The format line | What RustEdit read: the format, the bits, the channels and the size. For a file of numbers it also gives the lowest and highest number. |
| Channel | For a colour picture: the value that makes the height. Grey is the brightness. Only shown for colour pictures. |
| Bits, Byte Order, Width, Height | For a RAW file: how it is stored. RustEdit fills them in from the file's size and values. Change them when the file comes out wrong. Byte Order Windows is the low byte first, Mac the high byte first. |
| From, Size | The part of the picture to use, in pixels. Drag the box on the picture, or its sides and corners. |
| Whole Picture | Uses all of the picture again. |
Real world heights
Instead of a file, RustEdit can download the heights of any place on Earth. It needs an internet connection, no account and no key.
- In Real World, type the place's Latitude and Longitude. You can also paste "latitude, longitude" (for example
57.23, -6.22), or a Google Maps or OpenStreetMap link, into Latitude: it fills both. - Set Area, the width of the square around the place, in km. It starts at your map's size, which keeps the real scale: one meter is one meter.
- Click Get Heights. The button shows a spinner and how many pieces are downloaded. The heights show on the left when they are done.
- To look a little further, drag the picture on the left. When you let go, the place moves by that much and its heights are downloaded.
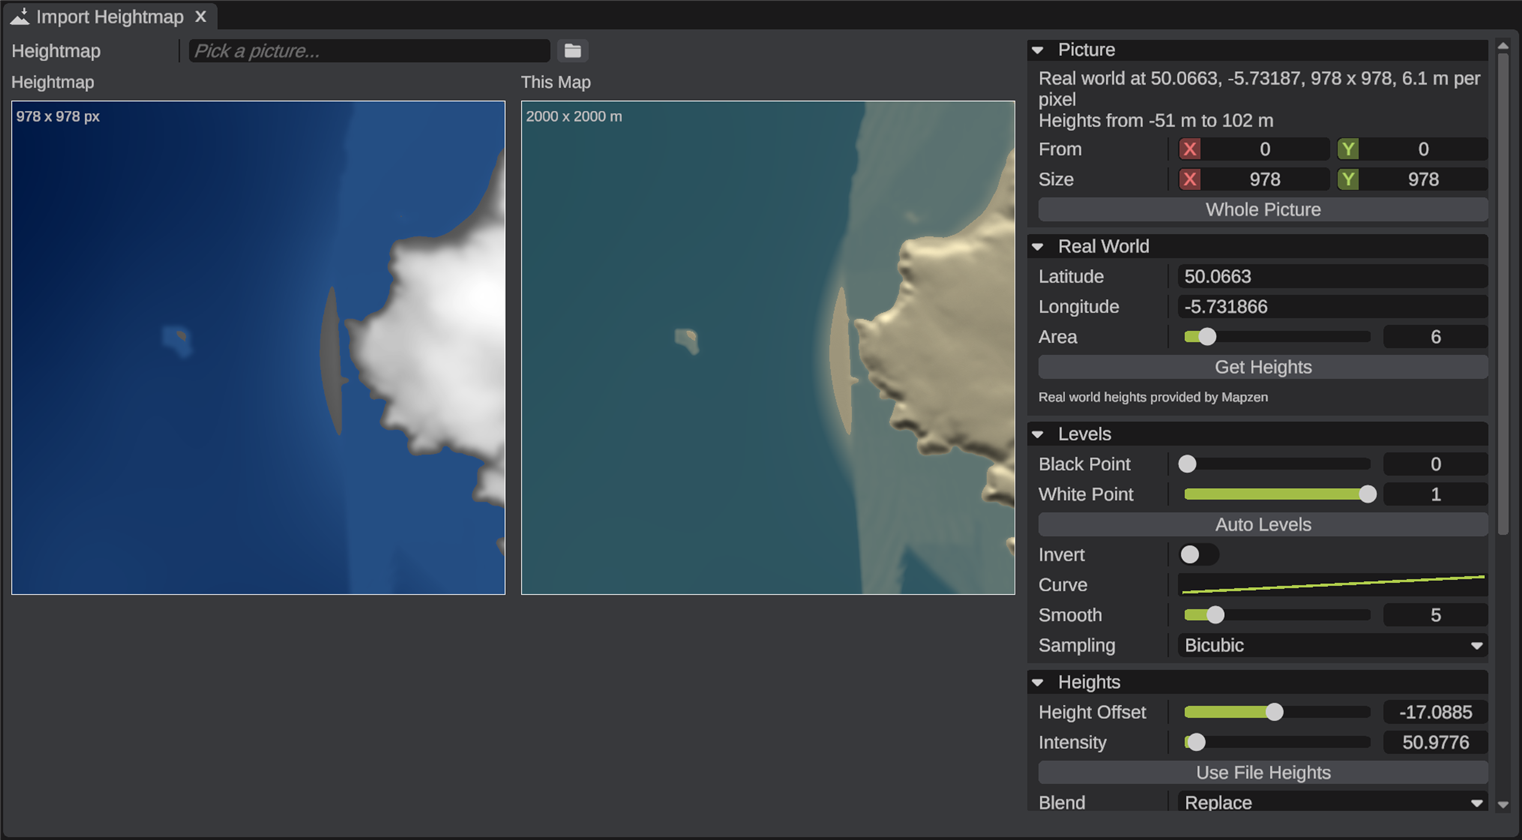
RustEdit keeps the place's real shape: the heights are scaled as much as the ground, and sea level stays at 0. Land higher than 450 meters is scaled down to fit, and the sea floor below -150 meters is cut off. Smooth is set to hide the blocks of the coarser data. You can change all of these after.
The heights have about 30 meters of detail in most places, 10 meters or finer in the USA and some other countries. A Rust map has 1 meter per pixel, so you get the real hills, valleys and coasts, not small detail. Downloaded pieces are kept on your PC, so a second try at the same place is fast.
| Option | What it does |
|---|---|
| Latitude | Degrees north. Below 0 is south. From -85 to 85. |
| Longitude | Degrees east. Below 0 is west. From -180 to 180. |
| Area | The width of the square area in km, from 0.5 to 50. The default is your map's size. |
| Get Heights | Downloads the heights. |
The heights come from the Terrain Tiles on AWS, made by Mapzen. They are made from these sources:
- ArcticDEM terrain data DEM(s) were created from DigitalGlobe, Inc., imagery and funded under National Science Foundation awards 1043681, 1559691, and 1542736.
- Australia terrain data © Commonwealth of Australia (Geoscience Australia) 2017.
- Austria terrain data © offene Daten Österreichs – Digitales Geländemodell (DGM) Österreich.
- Canada terrain data contains information licensed under the Open Government Licence – Canada.
- Europe terrain data produced using Copernicus data and information funded by the European Union - EU-DEM layers.
- Global ETOPO1 terrain data U.S. National Oceanic and Atmospheric Administration.
- Mexico terrain data source: INEGI, Continental relief, 2016.
- New Zealand terrain data Copyright 2011 Crown copyright (c) Land Information New Zealand and the New Zealand Government (All rights reserved).
- Norway terrain data © Kartverket.
- United Kingdom terrain data © Environment Agency copyright and/or database right 2015. All rights reserved.
- United States 3DEP (formerly NED) and global GMTED2010 and SRTM terrain data courtesy of the U.S. Geological Survey.
Levels
| Option | What it does |
|---|---|
| Black Point | This picture value and below become the lowest height. 0 to 1. The default is 0. |
| White Point | This picture value and above become the highest height. 0 to 1. The default is 1. |
| Auto Levels | Sets the black and white points to the picture's darkest and brightest pixels. Use it when the picture looks flat or all one shade. |
| Invert | Black is high and white is low. |
| Curve | Changes the heights between black and white. The default is a straight line. A curve that bends down makes flatter low ground and steeper hills. |
| Smooth | Blurs the picture by this many pixels, from 0 to 32. The default is 0. |
| Sampling | How the picture is read between its pixels. Bicubic (the default) is smoother when the picture is smaller than the map. |
Heights
| Option | What it does |
|---|---|
| Height Offset | The height of black, in meters. 0 is sea level. The default is -50. |
| Intensity | How many meters higher white is than black. The default is 300. |
| Use File Heights | For a file of numbers (float or signed, such as a DEM): uses its numbers as meters. Only shown for such files. |
| Blend | Replace (the default): the picture's heights. Add: added to the terrain that is there. Raise: only where the picture is higher. Lower: only where it is lower. |
| The heights line | The lowest and highest height the import makes, and how much of the area is above the sea. |
Placement
| Option | What it does |
|---|---|
| Whole Map | The picture covers the whole map. This is the default. |
| To, Size | The area on your map, in meters (X and Z). Drag the box on the map on the right, or its sides and corners. The area may hang over the edge of your map: the part off the map is left out. |
| 0, 90, 180, 270 | Turns the picture clockwise by that many degrees. |
| Flip X, Flip Z | Mirrors the picture east to west, or north to south. |
| Square, Circle | Fills the whole area, or the circle that fits in it. |
| Edge Fade | Meters inside the area's edge over which the picture blends into the terrain, from 0 to 500. The default is 0. |
The top of the picture is north.
Ocean edge
Ocean Edge lowers the terrain near the map's edges, so the map has sea around it, as Rust maps do.
| Option | What it does |
|---|---|
| Width | Meters from the map's edges over which the terrain goes down. 0 (the default) turns it off. |
| Depth | The height at the map's edges, in meters. The default is -50. The terrain is only lowered, never raised. |
Undo
The import is one undo step. Press Ctrl+Z to take it back. The import changes only the heights. Paint the textures, biomes and topology after it, or run the procedural steps. See Procedural Panel.
Tips
- A RAW file that comes in upside down was saved with the bottom row first, as Unity's terrain export does. Switch on Flip Z.
- A picture that shows all white or all black uses only a small part of its range. Click Auto Levels.
- To add hills to an existing map, use Blend Add or Raise with an area and an Edge Fade.
- Maps larger than 6000 meters need the RustEdit extension on the server. See The Server Extension.
Troubleshooting
| Problem | What to do |
|---|---|
| Import is grayed out | Pick a file in Heightmap first. |
| "... could not be read" | The file is not a picture RustEdit reads, or it is damaged. Save it as a 16 bit PNG and try again. |
| "The size of ... fits no RAW layout" | Set the RAW file's Width, Height and Bits. |
| "This interlaced PNG was read with 8 bits" | Save the PNG without interlacing to keep its 16 bits. |
| The terrain has steps | Use a 16 bit file, or raise Smooth. |
| "No preview while the terrain graph shows its own preview" | Apply or stop the terrain graph preview. See Apply and preview. |
| "The heights could not be downloaded" | Check your internet connection and try again. |
| "Latitude goes from -85 to 85" | Fix the place. The real world heights have nothing nearer the poles. |
Related
- Map Tools
- Merge Map
- Resize Map
- AI Tools: Import Heightmap does the same for an AI app