Graph Editor
RustEdit ProThe Terrain Graph window is where you build a graph. This page explains the window, how to add and wire nodes, and the keys that work in it.
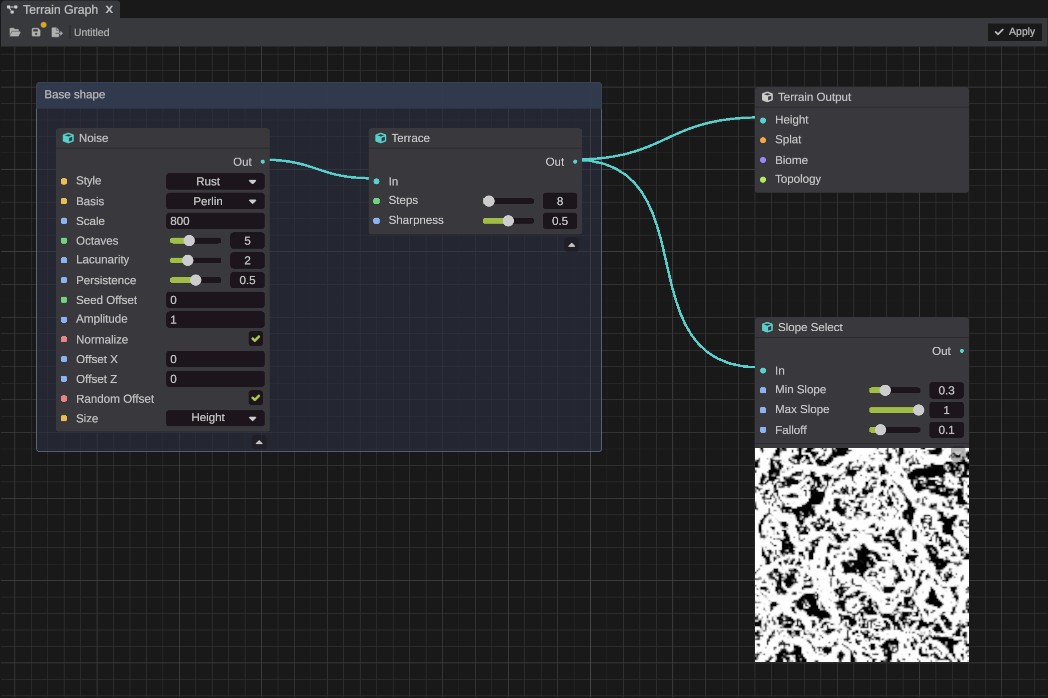
The window
Open it with the Terrain Graph button in the toolbar on the left, or with .
- Toolbar along the top:
- Open: opens a saved graph.
- Save: saves the graph to its file. A dot on the button means the graph has changes that are not saved yet.
- Save As: saves the graph to a new file.
- The file name of the open graph, or Untitled before you save it.
- Apply, on the right: writes the graph's result into the map. See Apply and preview.
- Canvas: the grid where the nodes are.
- Sidebar, down the left: shown only while you edit a custom node. See Custom nodes.
A new graph starts with a Terrain Output node.
Move around the canvas
| To | Do this |
|---|---|
| Pan | Drag the empty canvas with Mouse Middle, or hold Alt and drag with Mouse Left. |
| Zoom | Scroll. The view zooms around the pointer, from 25% to 200%. |
| Go back to the start view | Right-click the empty canvas and pick Reset View. |
Add nodes
- Right-click the empty canvas.
- Pick Add Node, then a category, then a node. The node appears where you clicked.
The categories are listed in Nodes. Your saved custom nodes are under Custom.
To move a node, drag its title bar. Dragging the body of a node does not move it.
Wire ports
Drag from one port to another to wire them. You can drag from an output to an input, or from an input to an output. While you drag, the ports that cannot take the wire are dimmed.
- An input takes one wire. A new wire into an input replaces the old one.
- An output can feed any number of inputs.
- A wire that would make a loop is refused.
What connects to what
The socket's shape says what a port carries:
| Socket | Carries | Connects to |
|---|---|---|
| Round | A map (a texture), such as a height map, a mask or the splat layers. | Any other round socket. |
| Square | One number, a switch or a choice. | A square socket of the same kind. A decimal number does not connect to a whole number. |
The color of a round socket says how many channels the map has:
| Color | Channels | Used for |
|---|---|---|
| Cyan | 1 | Height, masks, noise. Also ports that take any width. |
| Pink | 4 | RGBA: four loose masks on one wire. |
| Violet | 5 | Biome. |
| Orange | 8 | Splat. |
| Lime | 31 | Topology. |
Maps of different widths still connect. A one-channel map wired into a wide input is used for every channel. A wide map wired into a one-channel input gives one channel: the input then shows a channel picker, where you choose which layer to read. Auto lets the graph choose.
Drop a wire on the canvas
Drag a wire from a port and let go on the empty canvas. A menu lists only the nodes that have a port that fits. Pick one, and RustEdit adds it where you let go and wires it up. If no node fits, the menu says "No node fits this wire".
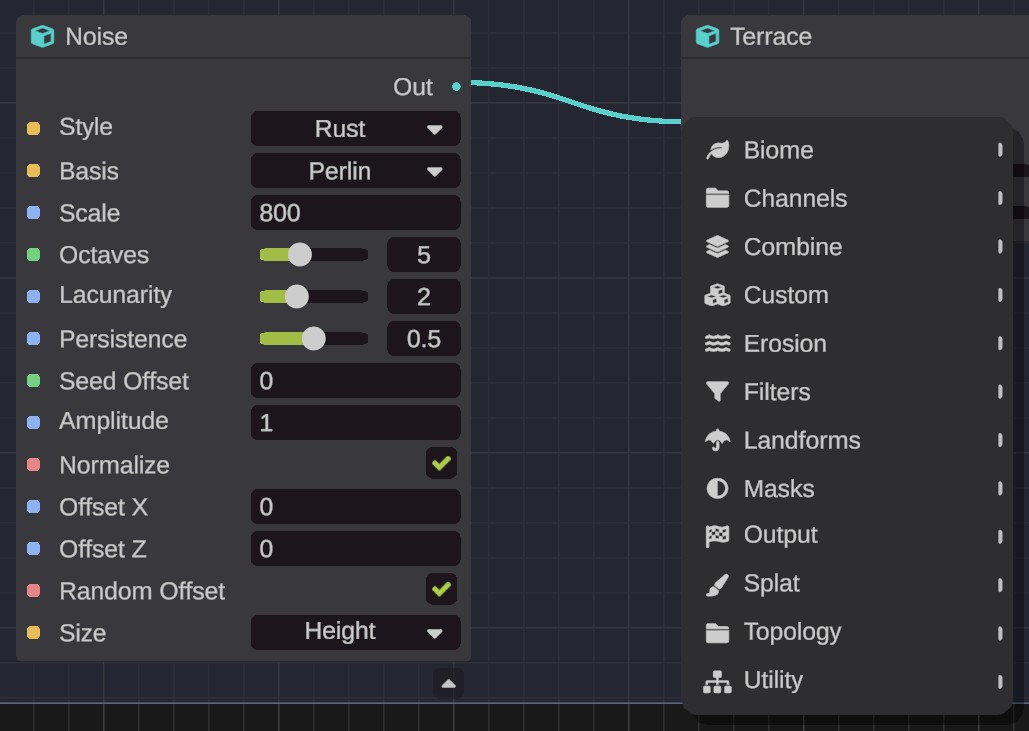
Remove a wire
- Drag from the socket of a wired input. The wire comes off with the pointer. Let go on another input to move it there, or away from the ports to remove it. On the empty canvas, the drop-wire menu opens too: pick a node to wire it, or close the menu.
- Or right-click a port and pick Disconnect. On an output with several wires, pick Disconnect All.
Removing or moving a wire this way is one undo step.
Portals
A portal sends a value across the graph without a long wire. Big graphs use them to stay readable.
- Right-click an output port and pick Send to Portal. A small named pill appears beside the port. Type a name for it.
- Right-click an input port anywhere in the graph, pick Receive from Portal, then pick the portal's name. A pill appears beside that input. It gets what the first pill sends.
Hover a pill to see dashed lines to the pills it is linked with. Double-click a sending pill to rename it. To switch a receiving pill to another portal, right-click it and pick from Portal. Portals that do not fit the input, or that would make a loop, are grayed out.
Set values on a node
An input with nothing wired in has a control beside it, so you can set its value on the node:
| Control | Use |
|---|---|
| Number field | Type a number. You can also type a simple sum, such as 2*512. |
| Slider | Drag it, or type in its field. A drag is one undo step. |
| Check box | Turns the setting on or off. |
| Drop-down button | Click it and pick a choice from the menu. |
| List with check boxes | For settings that take several choices, such as topology layers. The button says Nothing, Everything, the one name, or Mixed. |
When you wire a node into an input, its control is grayed out: the wire gives the value.
Some inputs show only when the node uses them. For example, Math hides B when its Operation is Abs, Sin or Cos.
Select nodes
| To | Do this |
|---|---|
| Select one node | Click it. |
| Add or remove a node from the selection | Ctrl+Mouse Left on it. |
| Select with a box | Drag on the empty canvas with Mouse Left. Hold Ctrl to add to the selection. |
| Select all | Ctrl+A. |
| Clear the selection | Click the empty canvas. |
Drag the title bar of a selected node to move the whole selection.
The node menu
Right-click a node to see its menu:
| Item | What it does |
|---|---|
| Cut, Copy | Puts the node on the graph's clipboard. Paste it with Paste in the canvas menu. Copy works on one node at a time. |
| Duplicate | Adds a copy of the node, a little below and to the right. |
| Group Selection | Draws a group box around the selected nodes. |
| Create Custom Node | Turns the selected nodes into a custom node. See Custom nodes. |
| Edit Custom Node, Make Unique | Only on custom nodes. See Custom nodes. |
| Preview | Shows or hides the node's preview picture. |
| Delete | Deletes the node. With several nodes selected, Delete Selected deletes all of them. |
The Terrain Output node cannot be deleted or copied: it is the only way out of the graph, and every graph has one. A graph file saved without one gets one when you open it. A file from an older version can hold two: then only the first one added is used, and you can delete the other.
Group boxes
A group box is a named frame around nodes. Moving the box moves the nodes in it.
- Select the nodes.
- Press Ctrl+G, or right-click one of them and pick Group Selection. A box appears around them. Type its name.
You can also right-click the empty canvas and pick Create Group for an empty box. Drag nodes into it.
- Drag the box's title bar to move it. Every node whose middle is inside the box moves with it.
- Drag the box's left, right or bottom edge, or a bottom corner, to resize it.
- Double-click the title to rename the box.
- Right-click the title for Rename, Select Nodes and Delete Group. Deleting a group keeps the nodes in it.
When a node inside a box grows, for example when you turn on its preview, the box grows with it.
Node previews
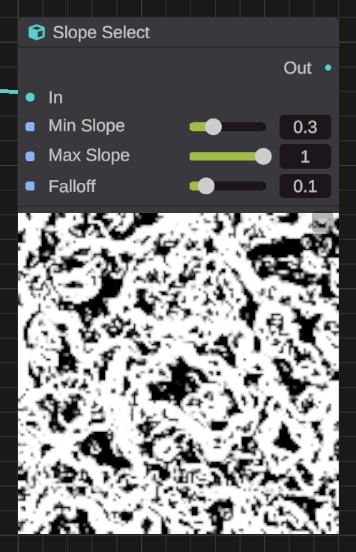
A node can show a small picture of its result, so you can see what each part of the graph does.
- Click the arrow button on the node's body, or right-click the node and pick Preview.
- Height and masks show in gray. Splat shows the ground colors, biome shows the biome colors, and topology shows white where any flag is set. An RGBA map shows its color, with its fourth channel as a strip down the right edge.
- Nodes that only give numbers have no preview.
Only nodes that lead to the Terrain Output run, so a node that is not wired toward it shows no picture. Inside a custom node, every node runs.
Previews are not saved in the graph file. They turn off when you hide or close the window.
Save and open graphs
A graph is saved as a .terraingraph file. It holds the nodes, the wires, the values you typed, the group boxes and where everything is on the canvas.
- Save writes to the graph's file. The first time, it asks where to save.
- Save As always asks for a new file.
- Open loads a graph in place of the one in the window. If the graph has changes that are not saved, RustEdit first asks: "Are you sure you want to open another graph? Any unsaved changes will be lost".
- Ctrl+S saves the graph while the window is shown. While you edit a custom node, it saves the custom node instead.
A graph file does not hold the custom nodes it uses. It only points at them. To give a graph to someone, also give them the custom nodes it uses. See Share custom nodes.
RustEdit does not ask you to save the graph when you quit. Save it before you close RustEdit.
Ctrl+S in the graph window saves the graph, not the map. Save the map with Ctrl+Shift+S or .
Undo
The graph has its own undo history, apart from the map's.
- Ctrl+Z undoes the last graph edit, and Ctrl+Y or Ctrl+Shift+Z redoes it, while the pointer is over the graph. With the pointer anywhere else, Ctrl+Z and Ctrl+Y undo and redo map edits as usual.
- The history keeps the last 128 steps.
- Adding, deleting, moving and wiring nodes, typed values, and group box changes are undo steps.
- These are not undo steps: the Graph Seed node's number, the image picked in a Texture node, the Curve node's curve, and renaming a portal.
- Each custom node has its own history. Stepping into a custom node and back out keeps the outer graph's history.
- Apply is an undo step in the map's history, not the graph's. See Apply and preview.
Keys in the graph
Most keys work only while the pointer is over the graph, and none work while you type in a field.
| Keys | What they do |
|---|---|
| Ctrl+Z | Undo a graph edit. |
| Ctrl+Y, Ctrl+Shift+Z | Redo a graph edit. |
| Delete | Delete the selected nodes. |
| Ctrl+A | Select every node. |
| Ctrl+G | Draw a group box around the selected nodes. |
| Ctrl+S | Save the graph, or the custom node you are editing. Works anywhere while the window is shown. |
| Ctrl+Mouse Left | Add a node to the selection, or take it out. |
| Mouse Left drag on the canvas | Select with a box. Add Ctrl to add to the selection. |
| Mouse Middle drag, Alt+Mouse Left drag | Pan. |
| Scroll | Zoom. |
| Double-click a custom node | Open it. |
| Double-click a group title or a sending pill | Rename it. |