Editing Splines
You edit a spline's knots in spline edit mode. In this mode the scene view shows the knots and tangent handles of the selected spline entity, and the spline widget shows the values of the selected knots.
Make a spline entity
The Content Browser has a Splines folder with ready-made shapes. Each one makes a new spline entity.
| Item | What you get |
|---|---|
| Empty Spline | A spline entity with no knots. Draw the spline yourself. |
| Linear Spline | A straight line of three knots, 40 m long. |
| CatmullRom Spline | A smooth closed loop through four knots. |
| Circle Spline, Rounded Square Spline | Closed round shapes. |
| Square Spline, Pentagon Spline, Hexagon Spline, Octagon Spline, Star Spline | Closed shapes with straight sides. |
| Decagon Spline | A closed shape with straight sides. It has 20 sides, not 10. |
| Helix Spline | A spiral of three turns. |
To place one:
- Drag it into the scene view. It goes where you drop it.
- Or double-click it, or right-click it and click Place in Scene. It goes in the middle of the view.
The new spline entity turns to face the way the camera looks, and it is selected. Its name in the Hierarchy is "Spline" until you rename it.
Turn on spline edit mode
- Select the spline entity, for example in the Hierarchy.
- Click Activate Spline Edit Mode in the Inspector, or click the spline button in the transform widget. Its tooltip says "Enable spline editing mode". The knots of the entity's splines show in the scene view.
To leave spline edit mode, click the spline button in the transform widget again.
While spline edit mode is on:
- You edit one spline entity. With more than one selected, you edit the first spline entity in the selection.
- You cannot select other objects. The selection stays on the spline entity until you leave spline edit mode.
- The transform gizmo moves and turns the selected knots, not the entity.
- The Inspector shows the Splines list, the Spline Component dropdown and the panel of the spline component.

Draw a spline
In spline edit mode, the transform widget has a second button. Its tooltip says "Draw splines in the scene view". Click it to start drawing.
- Click the ground to place the first knot. A click without a drag makes an Auto knot: the curve sets its own tangents.
- Click again to add the next knot at the end of the spline. To make a Bezier knot, press the mouse button and drag: the drag sets the knot's tangent.
- To close the spline into a loop, click its first knot.
- To finish this spline and start another one, click Mouse Right.
- To stop drawing, press Esc or Enter.
Where you click decides what happens:
| Click on | Result |
|---|---|
| The ground or an object | A new spline starts there. On an Empty Spline, the first spline is filled. |
| The end knot of an open spline | You go on drawing from that end. |
| Another knot | A new spline starts there, and its first knot is linked to the knot you clicked. |
| A spline's curve | A knot is put in the curve there, and a new spline starts from it, linked to it. |
When movement snap is on in the transform widget and its Mode is World, new knots snap to the grid.
Select knots and tangents
| Do this | Result |
|---|---|
| Click a knot or a tangent handle | Selects it. A knot linked to other knots selects them too. |
| Ctrl+Mouse Left on a knot | Adds it to the selection, or takes it out. |
| Drag a box in an empty part of the scene view | Selects the knots in the box. Hold Ctrl to add them, Alt to take them out. |
| Click Mouse Right without moving the mouse | Clears the knot selection. |
Selected knots are orange. A selected spline shows an arrow on each curve, the way the spline runs.
Move knots and tangents
- Drag a knot or a tangent handle that is not selected. It moves on its own flat plane. Near one of the knot's axes, it snaps to that axis.
- Hold Alt while you drag to move it up or down.
- Hold Ctrl while you drag to put it on the ground.
- Use the transform gizmo on the selected knots: W moves them and E turns them. Scale does not change knots.
- Type a position in the spline widget.
Linked knots always move together.
The spline widget
The spline widget shows when you select knots or tangents. Its header says what is selected, for example "Knot 2 of 5 (Spline 1) selected". Drag the header to move the widget.
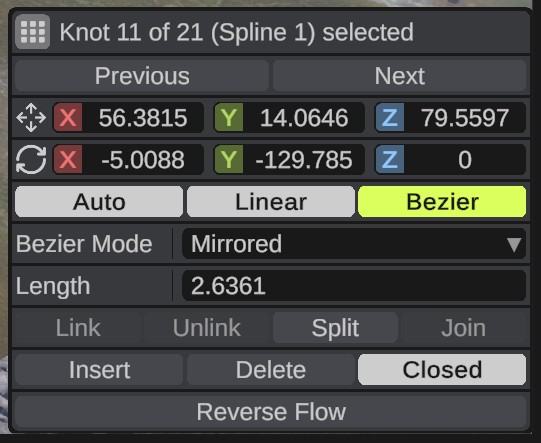
| Option | What it does |
|---|---|
| Position | The knot's place in the world, in meters. With several knots selected, a typed value is given to all of them. |
| Rotation | The knot's rotation in degrees. Hidden when an Auto knot is selected. |
| Roll | The tilt of an Auto knot around the curve, in degrees. |
| Previous, Next | Select the knot before or after the selected one. Round a loop, they wrap. |
| Auto | The curve sets the tangents itself. Only the roll can be changed. |
| Linear | No tangents. The spline goes straight to the next knot. |
| Bezier | Shape the curve with the tangent handles. |
| Bezier Mode | Mirrored: both tangents have the same length. Continuous: each tangent has its own length. Broken: each tangent has its own length and direction. |
| Length | The length of both tangents of a Mirrored knot. |
| In Length, Out Length | The tangent lengths of a Continuous knot. |
| Tangent In, Tangent Out | The tangents of a Broken knot. |
| Link | Links the selected knots so they move together. |
| Unlink | Removes the links from the selected knots. |
| Split | Splits the spline in two at the selected knot. Not on the end knot of an open spline. |
| Join | Joins two selected end knots of two splines into one spline. |
| Reverse Flow | Reverses the direction of the selected splines. |
| Insert | Puts a new knot halfway to the next knot. On the last knot of an open spline, it adds a knot past the end. |
| Delete | Deletes the selected knots. |
| Closed | Closes the selected splines into a loop, or opens them. |
The direction of a spline matters for some paths. The cargo ship sails its path the way it was drawn, and a river gets wider along its length.
Add and remove knots
- Insert in the spline widget adds one knot after the selected knot.
- Ctrl+D adds a knot halfway along the curve before each selected knot.
- Delete deletes the selected knots.
Ctrl+D and Delete work while the mouse is over the scene view. They are also in the menu as Duplicate Selection and Delete Selection.
You cannot add a knot past the end of a closed spline. Open it first, or use Insert on a knot in the middle.
The Inspector in spline edit mode
The Splines list has one row for each spline of the entity. Open a row to see:
- Closed Loop: joins the ends of the spline into a loop.
- Knots: every knot of the spline, five to a page. Each knot has its Position, Rotation, the Auto, Linear and Bezier buttons, Bezier Mode and its tangents. Here the position is measured from the spline entity, not the world.
The add button under Splines copies the selected splines, or the last spline when none is selected. The remove button deletes the selected splines.
The add button under Knots puts a knot after the selected knot, or at the end. The remove button deletes the selected knots. Selecting knots in the list selects them in the scene view.
Undo
Ctrl+Z undoes and Ctrl+Y redoes. Each of these is one undo step:
- Drawing a knot, moving knots with the gizmo or by dragging, and typed values.
- Every button and field of the spline widget.
- Adding and removing knots, with the hotkeys or in the Knots list.
- Changes to the knot selection.
Some changes in the Inspector cannot be undone: the Closed Loop switch, adding and removing whole splines in the Splines list, the Spline Component dropdown, and the path type and settings rows. Changing the Spline Component removes the old component with the path types and settings of every spline of the entity. Save the scene before you remove splines or change the spline component.
Keys
In spline edit mode, with the mouse over the scene view:
| Keys | What they do |
|---|---|
| Mouse Left | Select a knot or tangent. Drag one to move it. |
| Ctrl+Mouse Left | Add a knot to the selection, or take it out. |
| Alt while dragging | Move the knot or tangent up or down. |
| Ctrl while dragging | Put the knot on the ground. |
| Mouse Right | Clear the knot selection. While drawing, finish the spline. |
| W, E | Move or turn the selected knots with the gizmo. |
| Ctrl+D | Add a knot before each selected knot. |
| Delete | Delete the selected knots. |
| Esc, Enter | Stop drawing. |
| Ctrl+Z, Ctrl+Y | Undo, redo. |