Clone and Stamper
Two Sculpt tools of the Terrain Tools panel copy shapes onto the ground. Clone copies terrain from another part of the map. Stamper stamps a height picture, such as a hill or a lake bed.
Clone
Clone copies the height from a sample point to where you paint. It is in the Sculpt group of the tool list.
How to clone terrain
- Open the Terrain Tools, click Sculpt and pick Clone.
- Hold Shift and click the place you want to copy from. A brush outline marks the sample point.
- Click or drag where you want the copy. The height under the sample point is copied under the brush.
The brush Size sets how much is copied with each stamp. If you paint before you set a sample point, the Notifications panel says "Hold Shift and click to set the point to clone from first". Picking another tool clears the sample point.
Clone Splat changes only the terrain you see, not the map's own splat. The copied ground textures go away again, at the latest when you let go of the mouse, and they are not saved. Clone copies the height only. To copy ground textures, paint them with the Paint tools.
Clone options
| Option | What it does |
|---|---|
| Behaviour | How the sample point moves. Snap: it follows the brush while you paint, then snaps back to where you set it when you let go. Follow On Paint: it follows the brush while you paint and stays where it ended. Fixed: it always stays where you set it. |
| Offset | Raises or lowers the copied height, from -1000 to 1000. The copy moves by half the value in meters: an Offset of 10 raises it 5 m, -10 lowers it 5 m. |
| Clone Height | Copies the height from the sample point. |
| Clone Splat | Copies the splat from the sample point, but the copy does not stay. See the warning above. |
Stamper
Stamper stamps a height picture onto the terrain: white parts of the picture raise the ground, black parts leave it. It is in the Sculpt group of the tool list. Each click places one stamp.
How to stamp
- Open the Terrain Tools, click Sculpt and pick Stamper.
- In Style, pick a kind of stamp, such as Hills or Mountains.
- In Stamps, click a picture.
- Set Scale, Height and Rotation in the Stroke section of the Mesh Stamper section.
- Move the mouse over the terrain. The preview shows the stamped heights.
- Click to place the stamp. Hold Ctrl while you click to lower instead of raise, or the other way around in Subtractive mode.
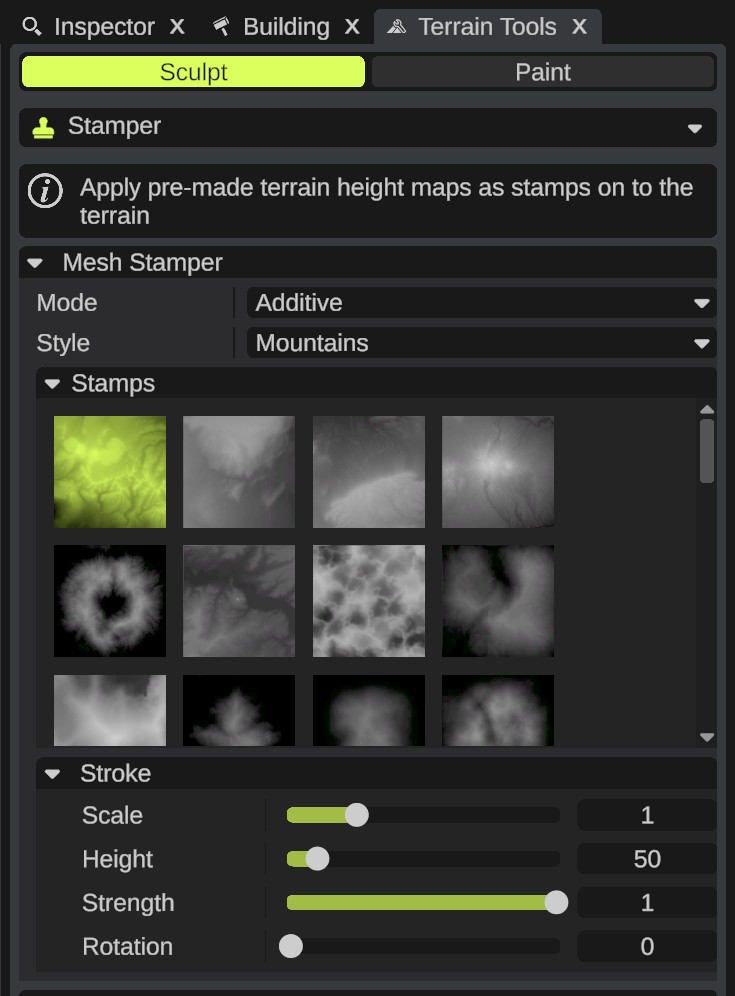
The Stamper replaces the Brushes grid and the Stroke section of the panel with its own. The Filters still work on it.
Stamper options
| Option | What it does |
|---|---|
| Mode | Additive raises the ground. Subtractive lowers it. |
| Style | The kind of stamp: Hills, Islands, Lakes, Mesas, Mountains, Plains, Rivers, Rocks, Valleys, Waterfalls, or Custom for your own. |
| Stamps | The pictures of the style. Click one to use it. |
| Scale | Meters of the stamp for each pixel of its picture, from 0.01 to 4. A 256 pixel picture at Scale 2 makes a stamp 512 m wide. |
| Height | How many meters the white parts of the stamp raise or lower the ground, from 0 to 500. The default is 50. |
| Strength | How much of the stamp's height is applied, from 0 to 1. |
| Rotation | Turns the stamp, from 0 to 359 degrees. |
Add your own stamps
- Make a PNG height picture: white is high, black is low. RustEdit reads the picture as heights, not colors.
- Put the file in your Stamps folder. By default, this is the
CustomStampsfolder next to the RustEdit app. To use another folder, set it at , in Paths > Stamps. - Restart RustEdit.
- In the Stamper, pick Style = Custom. Your pictures show in Stamps.
Keep the edges of the picture black, so the stamp blends into the ground around it. The stamp has no effect outside its picture, so white edges leave a sharp step.
RustEdit reads only .png files, and only the red channel of the picture, so use a grayscale picture. Every PNG is read with 256 grey levels. A 16-bit picture loses its extra detail and works like an 8-bit one, so a stamp with a large Height can show small steps.