Height Tools
The height tools are the Sculpt tools of the Terrain Tools panel. They change the height map: the shape of the ground. Every tool uses the brush, the Stroke settings and the Filters of the panel, unless its section says something else.
Use a height tool
- Open the Terrain Tools and click Sculpt.
- Open the tool list and pick a tool.
- Set the tool's options in its section, under the tool list.
- Hold Mouse Left and drag over the terrain.
Most tools show their result under the brush before you click. Each stroke is one undo step: Ctrl+Z undoes it.
The tools are in five groups in the tool list:
| Group | Tools |
|---|---|
| Basic | Raise/Lower Height, Flatten Height, Smooth Height |
| Sculpt | Bridge, Clone, Stamper, Ridge Erode, Terrace Erosion, Noise |
| Effects | Contrast, Erode Height, Sharpen Height, Flatten Slope |
| Erosion | Hydraulic Erosion, Thermal Erosion |
| Transform | Pinch Height, Smudge Height, Twist Height |
Clone and Stamper have their own page: Clone and Stamper.
Raise/Lower Height
Raises the ground in the shape of the brush.
- Hold Alt while you paint to lower the ground instead.
- At Strength 1, each stamp raises the ground by up to 10 m where the brush is white. Lower the Strength for finer work.
This tool has no options of its own.
Flatten Height
Pulls the ground to a set height. Each stamp moves the ground almost all the way to the height where the brush is white. The Strength setting does not change this.
| Option | What it does |
|---|---|
| Height | The height to flatten to, in meters, from -500 to 500. Sea level is 0. |
| Mode | Normal flattens all the ground under the brush. Its tooltip says Higher and Lower flatten only the ground above or below Height, but in this version they flatten all the ground under the brush, like Normal. |
To flatten only the ground above or below a height, add a Height filter to the tool.
The tool's help text says that Ctrl and right-click picks the target height. It does not change Height. To match the height of a point, hold Ctrl and right-click it: the Notifications panel shows its height in meters. Type that value into Height.
Smooth Height
Smooths the ground: each point moves toward the average of the points around it. Strength sets how far it moves with each stamp. This tool has no options of its own.
Bridge
Meant to make a straight, even slope between two points, for example a ramp or a road bed.
In this version, Bridge pulls the ground along the line down toward a height far below the two points, instead of making a slope between them. For points above sea level, that height is 250 m or more below sea level. Press Ctrl+Z to undo it. To make a ramp or a road bed, use a Road Bed terrain spline, or shape the ground with Flatten Height and Smooth Height.
- Pick Bridge.
- Hold Shift and click where the bridge starts. The start point shows as a brush outline on the ground.
- Click where the bridge ends. RustEdit changes the ground along the line between the two points.
- To make another bridge from the same start, click somewhere else. To set a new start, Shift-click again.
The width of the bridge is the brush Size. If you click before you set a start point, the Notifications panel says "You must set a starting point to create a bridge". Picking another tool clears the start point.
| Option | What it does |
|---|---|
| Spacing | The distance between two stamps of the brush along the bridge, in meters, from 1 to 500. |
| Width Profile | A multiplier for the width of the bridge along its length. |
| Height Offset Profile | Adds a height offset to the bridge along its length, in meters. |
| Strength Profile | A multiplier for the strength of the bridge along its length. |
| Horizontal Offset Profile | Moves the bridge to the side along its length, in meters. |
The profiles are curves. Their left end is the start of the bridge and their right end is its end.
Ridge Erode
Lowers ridges, as erosion would.
| Option | What it does |
|---|---|
| Sharpness | A larger value affects larger features, a smaller value smaller features. From -1000 to 1000. |
| Strength | The strength of the erosion. From -1000 to 1000. |
When the panel opens, both sliders show 0, but the tool works with Sharpness 0.7 and Strength 16. Each value changes only when you move its slider. Set both sliders before you paint, so the tool uses the values you see.
Terrace Erosion
Makes steps, or terraces, in the ground.
| Option | What it does |
|---|---|
| Steps | More steps make more, smaller terraces. From 2 to 1000. The default is 150. |
| Bevel Amount | How much of the original height to keep in the inside corner of each step, from 0 to 1. |
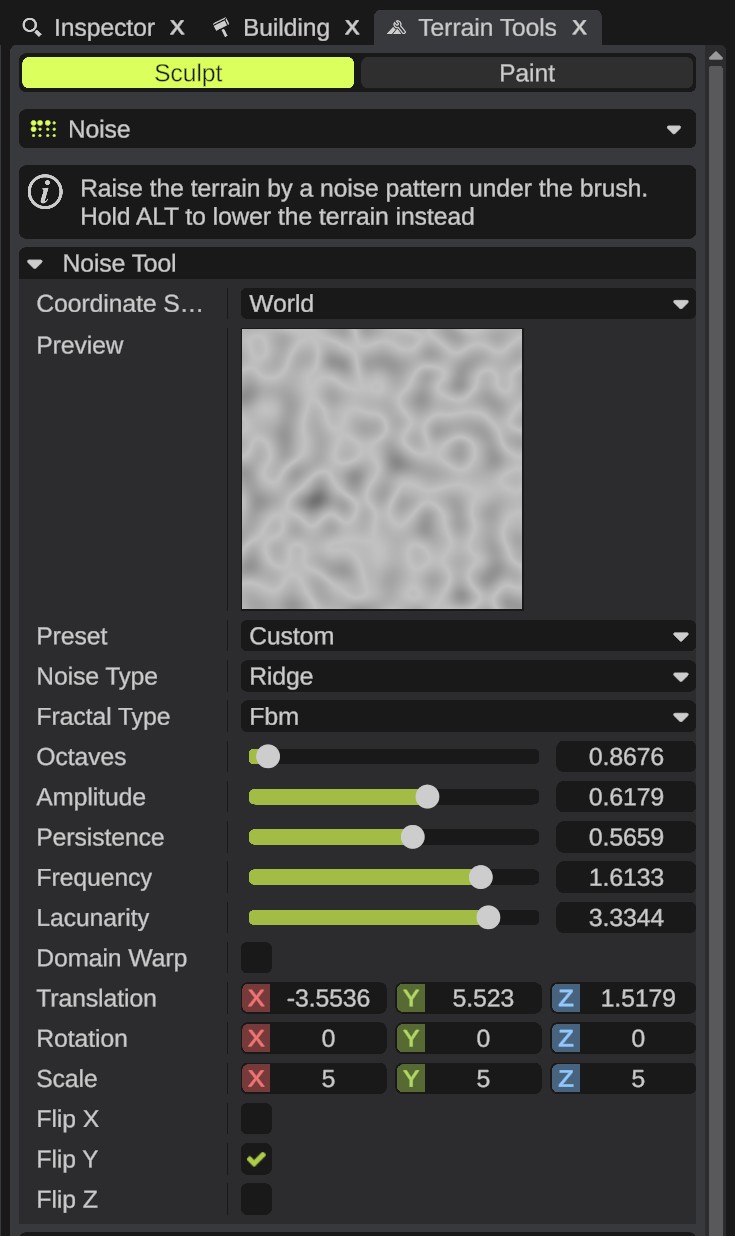
Noise
Raises the ground by a noise pattern under the brush, for rough, natural ground.
- Hold Alt while you paint to lower the ground instead.
- RustEdit keeps the noise settings for the next time you start it.
| Option | What it does |
|---|---|
| Coordinate Space | World: the noise stays in place on the ground, so the stamps of a stroke fit together. Brush: the noise moves and turns with the brush. |
| Preview | A picture of the noise. Grey is above the middle, cyan below. It shows 512 m in world space, or the brush in brush space. Drag it to move the noise, scroll to zoom. |
| Preset | Ready-made noise settings: Billow, Perlin, Ridge, Smooth Rock, Value, Voronoi and Warped Ridge. Picking one replaces every value below. Editing a value sets it back to Custom. |
| Noise Type | The base noise: Perlin, Billow, Ridge, Value or Voronoi. |
| Fractal Type | How layers (octaves) of the noise are stacked. Fbm adds finer and fainter layers. Strata turns them into bands, like rock layers. None uses the base noise alone. |
| Octaves | How many layers. A fraction blends toward one more. |
| Amplitude | The strength of the first layer. |
| Persistence | How much weaker each layer is than the one before. |
| Frequency | The frequency of the first layer. |
| Lacunarity | How much finer each layer is than the one before. |
| Strata Offset | Strata only. Shifts the bands up or down. |
| Strata Scale | Strata only. A higher value makes more bands. |
| Domain Warp | Bends the noise by itself, for swirls and turbulence. |
| Warp Iterations | How many times the noise bends itself. |
| Warp Strength | How far each bend pushes. |
| Warp Offset | Where the bends sample the noise. |
| Translation | Moves the noise. Y moves it through its third axis, which changes the pattern. |
| Rotation | Turns the noise, in degrees. Y turns it on the ground. |
| Scale | Noise cells in every 512 m in world space, or across the brush in brush space. |
| Flip X, Flip Y, Flip Z | Mirror the noise on that axis. |
Rows that do nothing for the picked Fractal Type are hidden. The Noise filter has the same noise settings.
Contrast
Makes the shapes in the ground stronger: high points rise and low points sink, compared with the ground around them. It changes rough ground more than smooth ground.
| Option | What it does |
|---|---|
| Feature Size | A larger value affects larger features, a smaller value smaller features. From 1 to 500. The default is 25. |
Erode Height
Wears the ground away from the high points around it.
| Option | What it does |
|---|---|
| Feature Size | A larger value affects larger features, a smaller value smaller features. From 1 to 500. The default is 150. |
Sharpen Height
Brings out detail: the differences in height become stronger.
| Option | What it does |
|---|---|
| Feature Size | A larger value affects larger features, a smaller value smaller features. From 1 to 100. The default is 25. |
Flatten Slope
Flattens the bumps in the ground but keeps its slope.
| Option | What it does |
|---|---|
| Feature Size | A larger value affects larger features, a smaller value smaller features. From 1 to 100. The default is 25. |
Hydraulic Erosion
Simulates water that carries ground away and drops it lower down. Hold Ctrl while you paint to turn the effect around.
This tool has no options in the panel: it uses fixed simulation settings. Use Strength and the brush to control it.
Thermal Erosion
Simulates weathering: rock crumbles and the loose ground settles down the slope.
This tool has no options in the panel: it uses fixed simulation settings. Use Strength and the brush to control it.
Pinch Height
Pulls the ground toward the middle of the brush. Hold Shift while you paint to push it out instead, so the ground bulges.
| Option | What it does |
|---|---|
| Amount | How strongly the ground is pulled, from 1 to 100. |
When the panel opens, the Amount slider shows 10, but the tool works with 5 until you move the slider. Its tooltip says negative values bulge, but the slider cannot go below 1: hold Shift to bulge.
Smudge Height
Pushes the ground in the direction you drag, like a finger in clay. This tool has no options of its own.
Twist Height
Twists the ground around the middle of the brush. Hold Shift while you paint to twist the other way.
| Option | What it does |
|---|---|
| Twist Amount | From -100 to 100. Negative values twist clockwise, positive values counterclockwise. The default is 10. |