Filters
Filters limit where a terrain brush works. For example, a Slope filter keeps a brush on flat ground, and a Layer filter keeps it where there is grass. Each tool in the Terrain Tools panel has its own list of filters.
How filters work
The filters make a mask: a value from 0 to 1 for each point under the brush. The tool then works at its normal strength times the mask. At 1 the tool works fully, at 0 it does nothing.
The mask starts at 1 everywhere. Each filter in the list then changes the mask, from top to bottom:
- The measure filters (Height, Slope, Aspect, Concavity, Noise and Layer) measure something at each point, turn it into a value with their Remap Curve, and multiply the mask by it. Their Strength fades the filter in: at 0 it has no effect, at 1 its full effect.
- The math filters (Abs, Add, Blur, Clamp, Complement, Max, Min, Multiply, Negate, Power and Remap) change the mask so far with a sum or rule.
Because each filter works on the result of the ones above it, the order matters. For example, Complement at the end of the list inverts everything above it.
With no filter switched on, the brush works everywhere under it.
Add and arrange filters
- Open the Terrain Tools, turn on Sculpt or Paint, and pick a tool.
- In the Filters header, click +. A menu of filters opens.
- Click a filter. It is added at the end of the list, and the list opens.
- Set the filter's options in its card.
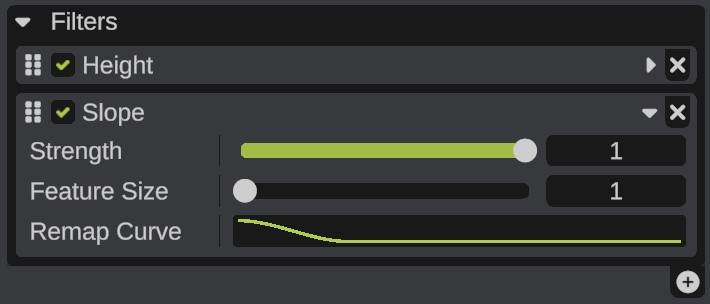
Each filter is a card:
| Part | What it does |
|---|---|
| Grip | Drag it to move the filter up or down the list. |
| Check box | Switches the filter on or off. A filter that is off is skipped. |
| Fold arrow | Shows or hides the filter's options. A filter with no options has no arrow. |
| X | Removes the filter. |
RustEdit saves each tool's filters in the filter-stacks folder of your Brushes folder, and loads them the next time you pick the tool. See Brushes.
The Height, Slope, Aspect and Concavity filters read the map's own heights, without the terrain changes of prefabs. The Layer filter reads the maps as you see them, with those changes. See How prefabs change the terrain.
Sculpt tools show the filtered brush in their preview. Paint tools show only the brush outline.
Remap curves
Each measure filter has a Remap Curve. Its left to right axis is the value the filter measured, from 0 to 1. Its height is the mask value for it. Edit the curve to choose which values the brush works on. Each filter's default curve is listed below.
Measure filters
Height
Uses the height of the ground.
| Option | What it does |
|---|---|
| Strength | Controls the strength of the masking effect. |
| Height Range | The heights the brush works in, in meters, from -500 to 500. Sea level is 0. |
| Remap Curve | Left is the low end of Height Range, right is the high end. The default curve fades in over the first quarter of the range and out over the last quarter, and is 0 outside the range. |
Slope
Uses the slope of the ground.
| Option | What it does |
|---|---|
| Strength | Controls the strength of the masking effect. |
| Feature Size | The size of the terrain features that count, from 1 to 20. A larger value ignores small bumps. |
| Remap Curve | Left is flat ground, right is a vertical wall. The default curve keeps flat ground and fades out up to about 22 degrees, so the brush works only on gentle slopes. |
Aspect
Uses the direction the slope faces. The brush Rotation sets the direction: the more a slope faces it, the higher the value.
| Option | What it does |
|---|---|
| Epsilon | The size of the terrain features that count, from 1 to 20. |
| Strength | Controls the strength of the masking effect. |
| Remap Curve | Left is ground that does not face the direction, right is ground that faces it fully. The default is a straight line. |
Concavity
Uses how hollow or raised the ground is.
| Option | What it does |
|---|---|
| Mode | Recessed measures hollows, such as valleys. Exposed measures raised ground, such as ridges. |
| Strength | Controls the strength of the masking effect. |
| Feature Size | The size of the terrain features that count, from 1 to 20. |
| Remap Curve | Left is none, right is very hollow or very raised. The default is a straight line. |
Noise
Uses a noise pattern, for broken, natural edges.
| Option | What it does |
|---|---|
| Strength | Controls the strength of the masking effect. |
| Coordinate Space | World: the noise stays in place on the ground, so the stamps of a stroke fit together. Brush: the noise moves and turns with the brush. |
| Use Heightmap | The noise follows the height of the ground instead of the place, so it follows the shape of the land. |
| Noise settings | The preview, preset, noise type, fractal and transform rows. They work as in the Noise tool. |
| Remap Curve | Left is the low end of the noise, right the high end. The default is a straight line. |
Layer
Uses a layer of the splat, biome or topology map, so the brush works only where the layer is.
| Option | What it does |
|---|---|
| Map | The map to read: Splat, Biome or Topology. |
| Layer | The layer of the map, such as Grass or Road. |
| Strength | Controls the strength of the masking effect. |
| Remap Curve | Left is none of the layer, right is all of it. A topology layer is either 0 or 1. The default is a straight line. |
The Layer filter reads the terrain's own topology, not your custom topology maps. For Jungle, it reads what is left over after the other four biomes.
Math filters
| Filter | Options | What it does |
|---|---|---|
| Abs | None | Makes every value of the mask positive. |
| Add | Value (default 0) | Adds the value to the mask. |
| Blur | Amount (1 to 100), Direction (-1 to 1) | Blurs the mask. Direction 1 blurs only up, -1 only down, 0 both. |
| Clamp | Range (0 to 1) | Keeps the mask inside the range: below the low end becomes the low end, above the high end becomes the high end. |
| Complement | Value (default 1) | Subtracts the mask from the value. At 1, it inverts the mask. |
| Max | Value (default 0) | Each point takes the greater of its value and Value. |
| Min | Value (default 1) | Each point takes the smaller of its value and Value. |
| Multiply | Value (default 1) | Multiplies the mask by the value. |
| Negate | None | Reverses the sign: 1 becomes -1, -1 becomes 1, 0 stays 0. |
| Power | Value (default 1) | Raises each value to the power of Value. Above 1 makes the mask darker, below 1 brighter. |
| Remap | From, To | Maps the values from the From range to the To range. |
Examples
Paint rock only on cliffs. Pick Paint, Layer = Splat, Channel = Rock. Add a Slope filter and edit its curve: 0 on the left, rising to 1 on the right half.
Raise only the low ground. Pick Raise/Lower Height. Add a Height filter with Height Range from -50 to 20.
Paint everywhere except roads. Add a Layer filter with Map = Topology and Layer = Road, then a Complement filter under it.